- HTML 5API -1일차2023년 11월 29일 16시 11분 09초에 업로드 된 글입니다.작성자: 삶은고구마
The Cat API - Cats as a Service.
A public service API all about Cats, free to use when making your fancy new App, Website or Service.
TheCatAPI.com
랜덤 고양이 사진을 제공하는 API
promise, axios 예제를 다룰 때 사용했다.
해당 api의 키 값을 사용해 url을 통하여 이미지를 랜덤으로 받을 수 있는데 사용 방법은 아래와 같다.
1.사이트 접속
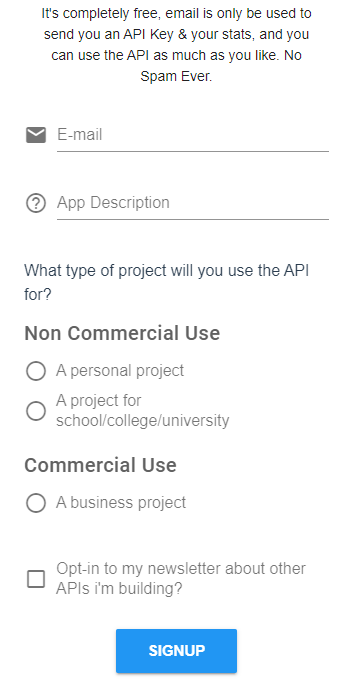
2.메인에서 get your api key - 본인 이메일로 api 키를 발급받는다.
나는 개인 스터디용이라 Signup for free를 선택함.
대강 내 이메일과 함께 이유에는 js 공부한다고 적어둠.
signup을 누르면 해당 이메일로 키값을 발급해주는데 이걸 사용하면 된다.
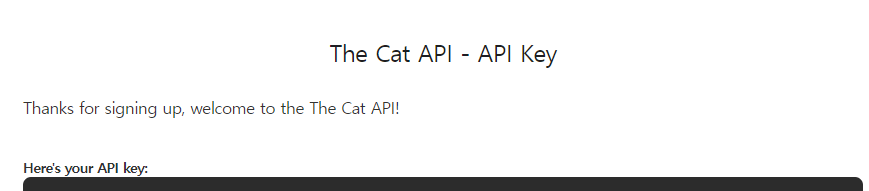
메일 옴ㅇㅇ 3.다시 메인으로 와서 우측 상단 Documentation 선택
4.좌측 리스트에서 Authentication 선택
비록 영어지만 친절하게 어떻게 사용해야 하는지 알려준다.
나같은 경우엔 axios를 공부해야 해서 Header에 키 값을 사용함.
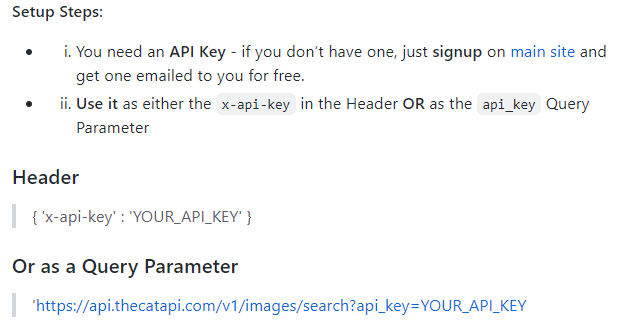
헤더 혹은 쿼리 파라메터로 사용 예제
cat api의 버튼 아이디가 btn5.
addEventListener click으로인해 클릭시 아래 코드를 실행함.
1.이미지 url, api key값, 그외 option을 적고 요청한다.(limit:1 , size:'full' 1장씩 풀사이즈로)
2.요청 성공시 응답결과 response를 then에서 받을 수있는데
3.내가 필요한건 url 값뿐이다. 고로 구조분해할당으로 response에서 원하는 값만 잘라서 사용한다.
const {data:[{url}]} = response;
4.createElement로 img태그를 동적 생성한다.
5.innerHTML을 초기화 하지 않으면 버튼을 누를때마다 페이지에
고양이 사진이 누적되기때문에 append하기전에 초기화하였다.
(몇 번 눌러서 랜덤으로 사진을 받았는데 gif도 있더라..)

/**
 * 1129
 * API KEY와 함께 전송하기
 * 보통 API는 전송량 제한을 위해 KEY값을 가지고 요청하게 된다.
 * -http 요청 헤더부분에 지정한 헤더명으로 등록해야한다.
 */
document.querySelector("#btn5").addEventListener('click',()=>{
    const url ='https://api.thecatapi.com/v1/images/search';

    //axios(url,options)
    axios(url,{
        headers:{
             'x-api-key' : '발급받은 key'
        },
        //한장씩,풀사이즈로.
        params:{
            limit:1,
            size:'full'
            }
        })
    .then((response)=>{
        console.log(response);
        //response > data >[{url}]
        const {data:[{url}]} = response;
        console.log(url);
        const img = document.createElement('img');
        img.src = url;
        img.style='width:200px;';
        //appendchild,append모두 가능
        const wrapper = document.querySelector(".cat-wrapper");
        wrapper.innerHTML='';//초기화
        wrapper.appendChild(img);
    })
});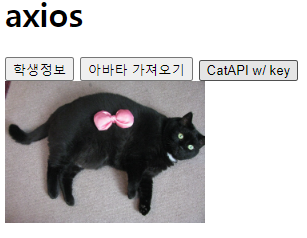
Web Storage
- 웹 브라우저에 key/value 페어 형식으로 데이터를 보관하는 기술
- cookie(서버전송) indexedDB(대용량 데이터)등
- webStorage는 간결하게 사용 가능하다.
- ㄴ저장된 정보를 절대 서버로 전송하지 않아 보안상 유리하다.
- 데이터는 도메인 별로 관리.
- key와 value는 모두 string 형태로 보관한다.
Local Storage Session Storage 삭제하기 전까지 영구 보관 서버 접속한 동안만 보관
(윈도우 닫으면 삭제)Local Storage 사용법 localStorage.setItem(key,value); 저장, 수정 (동일한 키에 다른 value를 사용하면 덮어씌워짐) localStorage.getItem(key.value); 해당 키 값으로 조회. localStorage.removeItem(key.value); 해당 키 값으로 삭제. localStorage.clear(); 모두 삭제.(현재 도메인에 해당하는) 단일값은 문제가 없지만, 객체와 배열을 다룰 땐 고려해야 할 사항이 있다.
아래의 코드로 확인할 수 있다.
key와 value는 string형태로 저장되기 때문에
string,number,boolean 등등 갖가지 형태로 저장되는 객체와 배열을 그대로 사용해버리면
문자열로 저장되어버린다. 제 구실을 못한다는 것이다.
그래서 저장 / 불러오기 할 때 json을 사용하여 포맷작업을 해줘야 한다.
//js객체
    const obj={
        username:'damgom',
        id:'nongdamgom123',
        married:false
    };
    localStorage.setItem('obj',obj);
    //이렇게 저장하면 obj.tostring으로 저장되어 [object Object]
    const objValue = localStorage.getItem('obj');
    console.log(objValue, typeof objValue); //string으로 나옴

    //배열도 마찬가지로 string형태로 저장됨.
    const arr = ['a','b','c'];
    localStorage.setItem('arr',arr);
    const arrValue = localStorage.getItem('arr');
    console.log(arrValue, typeof arrValue);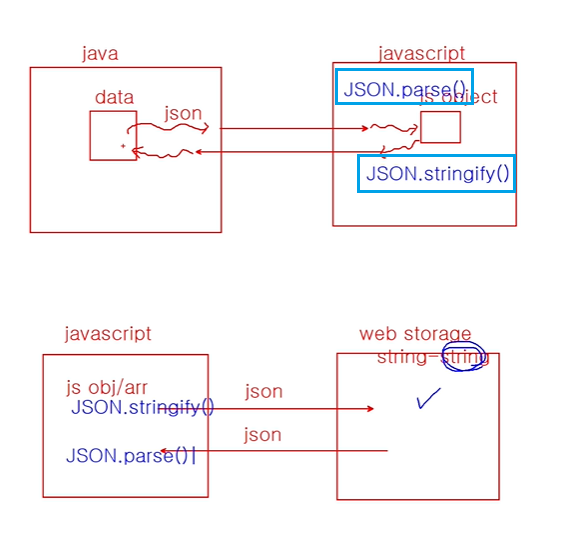
저장 읽기 JSON.stringify JSON.parse js 객체를 json으로 바꿈 json을 객체로 바꿔줌 예제.
const pet = {
        name : '초코',
        colors : ['black','brown'],
        owner:{
            name:'김아무개',
            tel:12345678,
            addr:'서울시 강남구'
        }
    };
    localStorage.setItem('pet',JSON.stringify(pet));

    //가져오기
    const pet2 = JSON.parse(localStorage.getItem('pet'));
    console.log(pet2, typeof pet2);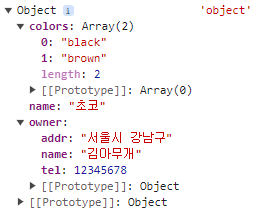
예제.
이름,내용을 적어서 저장버튼으로 localstorage에 저장 후 불러오기.
테이블 동적 생성하여 저장된 만큼 출력.
/**
 * localStorage에 저장~
 */
const saveGuestbook = () =>{
    console.log('saveGuestbook 호출...');

    /**
     * 여기서 할 일은? localstorage에 저장- 초기화 등등..
     * 어떤걸 key값으로 삼아야할까..
     * 리터럴로 작성않고, 관리와 재사용을 위한 클래스를 따로 만든다
     */

    //const guestbooks = []; //문제는 이렇게 하면 한번밖에 저장을 못함..[이전것 덮어씌워짐]
    //guestbooks로 저장된 배열이 있다면 그것을 getitem해서 사용하고 없으면 새 배열을 생성한다.
    const guestbooks = JSON.parse(localStorage.getItem('guestbooks')) || [];
    guestbooks.push(new GuestBook(name.value,content.value));
    localStorage.setItem('guestbooks',JSON.stringify(guestbooks));


    frm.reset();//초기화
    renderGuestBooks(); //방명록 출력
};

class GuestBook{
    constructor(name,content,createAt = Date.now()){
        this.name = name;
        this.content = content;
        this.createAt = createAt;
    }
}

/**
 * localStroage guestbooks를 화면에 출력하기
 * -guestbook->tr
 * -일시 : mills-> Date->mm/dd hh:mi 월/일 시:분
 * -방명록을 작성한 후 테이블이 표시..
 */
const renderGuestBooks = () =>{
    //1.guestbooks 읽어오기.
    const readGuestBooks = JSON.parse(localStorage.getItem('guestbooks'))|| [];

    // //2.작업할 tbody 가져오기
    // const myTable = document.querySelector("#tb-guestbook");
    // const tableBody = myTable.lastElementChild;
    // const tableBody2 = document.querySelector("#tb-guestbook tbody");//위의 두 줄을 한 줄로.
    // tableBody.innerHTML=''; //초기화
    // //index도 나중에 추가하기.
    // readGuestBooks.forEach((guestbook,index)=>{
    //     const {name,content,createAt} = guestbook;
    //     console.log(myTable.lastElementChild); //tbody
    //     //tableBody.innerHTML+=`<tr><th>${name}</th><th>${content}</th><th>${timeString}</th></tr>`;
    //     tableBody.innerHTML+=`<tr><th>${name}</th><th>${content}</th><th>${convertToDateTime(createAt)}</th></tr>`;
    // });


    //2.reduce 사용해서 작성해보기.
    //첫번째 요소인 html은 누적값이다.
    //https://tocomo.tistory.com/26
    document.querySelector("#tb-guestbook tbody").innerHTML =
    readGuestBooks.reduce((html,{name,content,createAt},index)=>{
        return`
        ${html}<tr><th>${name}</th><th>${content}</th><th>${convertToDateTime(createAt)}</th></tr>`;
        },"");
};

//한자리수 포맷을 위한 함수[두자리만들기]
const f = (n) => n<10? '0' +n :n;
//날짜 변환 함수 만들기
const convertToDateTime = (millis) =>{
    const d= new Date(millis);
    const mm = f(d.getMonth()+1);
    const dd = f(d.getDate());
    const hh = f(d.getHours());
    const mi = f(d.getMinutes());
    return `${mm}/${dd} ${hh}:${mi}`;
};
html script 위치
최적의 위치
1.</body>태그 바로 위
2.<title>과 <header>사이
보통 1번은 아무 이상이 없지만,
2번의 자리에 놓을 경우 버튼 이벤트가 걸린 버튼태그가있다면 에러가 발생한다.
순차적으로 코드를 읽기 때문에 위에서 선언된 script 태그를 통해 js파일을 읽다가
특정 버튼의 이벤트함수를 확인한 후 이런 오류를 뱉는다.

존재하지도 않는(null)애한테 onclick 속성을 줄수 없다!!
(아주 가끔 오타로 이런 오류가 발생하니 위치 문제가 아니라면 오타를 확인)
당연하다.
버튼은 저 밑에 body 태그 안에 있어서 오류를 뱉을 수밖에없다.
1의 위치로 옮기던가, 2에서 조치를 취하면 된다.
<title>HTML5API | WebStorage</title>
    <!--
        스크립트 태그의 2번째 최적화 자리,
        하지만 button click event가 있다면
        01_webstorage.js:18 Uncaught TypeError:
        Cannot set properties of null (setting 'onclick')
        와 같은 에러가 발생 할 수 있다.
        그런 경우, src 속성 앞에 defer(뜻:연기)를 붙이면 오류가 발생하지 않는다.
    -->
    <script defer src="js/01_webstorage.js"></script>
    <script>
        window.onload = () =>{
            //dom tree가 모두 load된 이 후 실행.
            //꼭 window.onload 이벤트에 함수를 작성해야 오류가 발생하지 않는다.
            renderGuestBooks();
        }
    </script>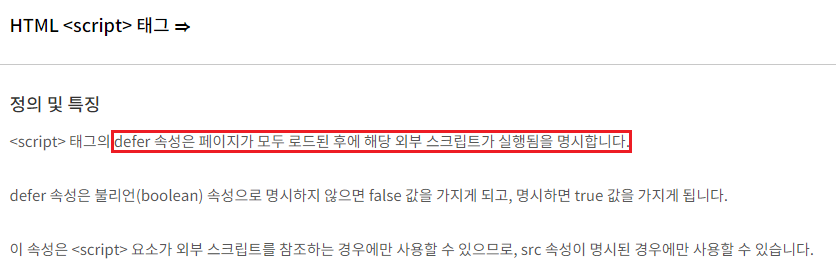
실습문제
체크유무로 팝업창 팝업/팝업하지 않기.
도메인별로 local storage가 관리된다.
'공부 > front-end' 카테고리의 다른 글
1204 TailWindCss (0) 2023.12.04 1201 jQuery (0) 2023.12.01 1128 Javascript 5일차 (1) 2023.11.28 JavaScript-5일차 (0) 2023.11.23 Javascript-1일차 (0) 2023.11.17 이전글이 없습니다.댓글